
Hello friends,
My favorite part of living in South Florida is the spectacular sunsets. This card was inspired by those very sunsets that will take your breath away. If you have ever wanted to learn this type of technique, then this tutorial is for you. All it takes is a little patience and a bit of practice. I must say that FSJ’s Fusion Inks are perfect for this type of technique as they will blend beautifully without much effort on your part. Are you ready? Let’s do it!
Step 1
Cut a piece of Whip Cream cardstock to 4” x 5.25.” Secure the circle die that measures 3” across to the front of the piece with Washi tape and run it through your die cut machine. You will only be using the circle.

Step 2
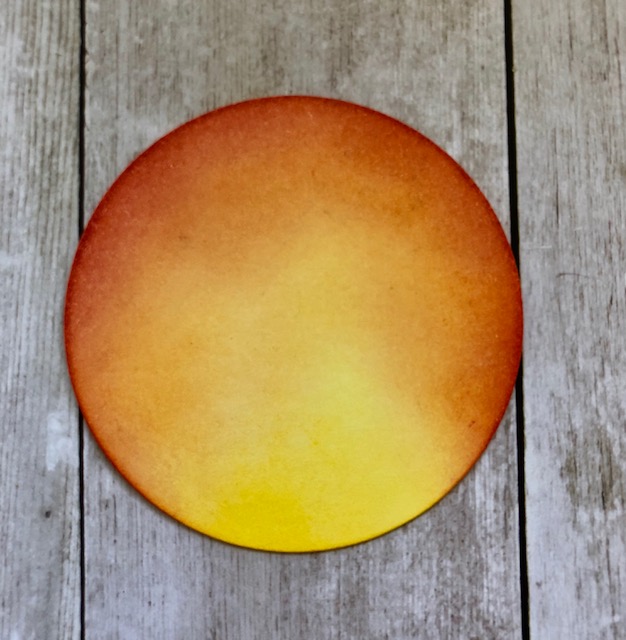
Using a Fusion Ink Sponge, apply Lemon Drop Fusion Ink to the bottom portion of the circle, as shown in the photo below.

Step 3
Repeat step 2 to add Citrus Cooler Fusion Ink around the Lemon Drop ink making sure the colors blend where they meet.

Repeat step 2 to add Tangerine Fusion Ink to the rest of the circle as shown in the photo below making sure the colors blend where they meet.

Apply Cranberry Bliss Fusion Ink around the edges of the top half of the circle only, as shown in the photo below. At this point you may repeat steps 2-5 to make your sunset more intense.
Step 6
Stamp the image of the tree from the Nature Grown Stamp Set onto the circle using Black Licorine Fusion Ink, as shown in the photo below.

Step 7
Cut a piece of Raspberry Berry cardstock to 4” x 5.25” and apply Dark Roast Fusion Ink around the
edges only.

Step 8
Use a scrap piece of Raspberry Berry cardstock to die cut the pieces shown below using the Blooming Details Die Set and the Summer Branch Die and apply Dark Roast Fusion Ink to the leaves of the summer branch piece.

Step 9
Glue the leaves to the card front using Craft Glue, as shown in the photo below.

Attach the circle to the card front using medium Foam Squares and stamp the sentiment to the lower right hand side.

Create a double bow with Rustic Rose Satin Ribbon and attach it on the lower left side of the circle using White Liner Tape. Embellish the center of the bow with a large, clear, Holiday Sparkle.

Step 12
Cover the circle piece on your card front with a piece of scrap paper and sprinkle Sparke silk over the card front. Cut a piece of Raspberry Berry cardstock to 4.25” x 11,” score at 5.5, and fold. Attach the card front to the card base.

Materials Used:
CARDSTOCK
CS-0097 Raspberry Berry
CS-0040 Whip Cream
INK
IP-0050 Dark Roast
IP-0049 Cranberry Bliss
IP-0048 Citrus Cooler
IP-0005 Tangerine Fusion
IP-0043 Lemon Drop
IP-0041 Black Licorice
STAMPS
SS-0352 Nature Grown
SS-0624 Strength & Hope
DIES
DI-0327 Blooming Details Die Set
DI-0039 Journey Circles
DI-0162 Summer Branch Die
OTHER
AC-0383 Holiday Sparkles
AC-0408 Rustic Rose Satin Ribbon
IP-0126 Sparkle Silk
JM-0014 Fusion Ink Sponges
AD-0111 Craft Glue
AD-0081 Easy Glide Adhesive
AD-0085 Medium Foam Squares
AD-0001 White Liner Tape
I hope you enjoyed the tutorial!
Angie
5 comments:
Excellent instructions. Beautiful card
I just love this...so pretty, tfs
Sister coach Cathy Derouche
cathyplus5.blogspot.com
This is really pretty, and I agree about the Florida sunsets!!! Your tutorial is really easy to understand and follow! I love it! :)
Love this and easy to follow. Great job and a beautiful card. Thanks so m7ch for sharing.
Thank you Angie for the excellent tutorial. I would like to use this technique to show those new to our inks how well they blend. And yes Florida sunsets are the best!
Post a Comment